20 Jun 2026
In my forays into software / webdev, I’ve purchased a handful of domain names for random things I want to post on the internet. Namecheap has been my go to, with bare bones and low prices (unlike GoDaddy, which tried to upsell me on TLS certs… for $25pa, on top of an already steep ~$75pa domain hosting fee). On namecheap, I’ve been able to find interesting domain names (with certs) for, consistently, in the ballpark of ~$10pa.
Imagine my surprise when I received a renewal notice that the cost of all of my domain names were about to 10x or more as the result of some (this is an oversimplification) deregulatory efforts. On further sleuthing, it also looks like domains with popular TLD extensions are going for $’000s 🤯.
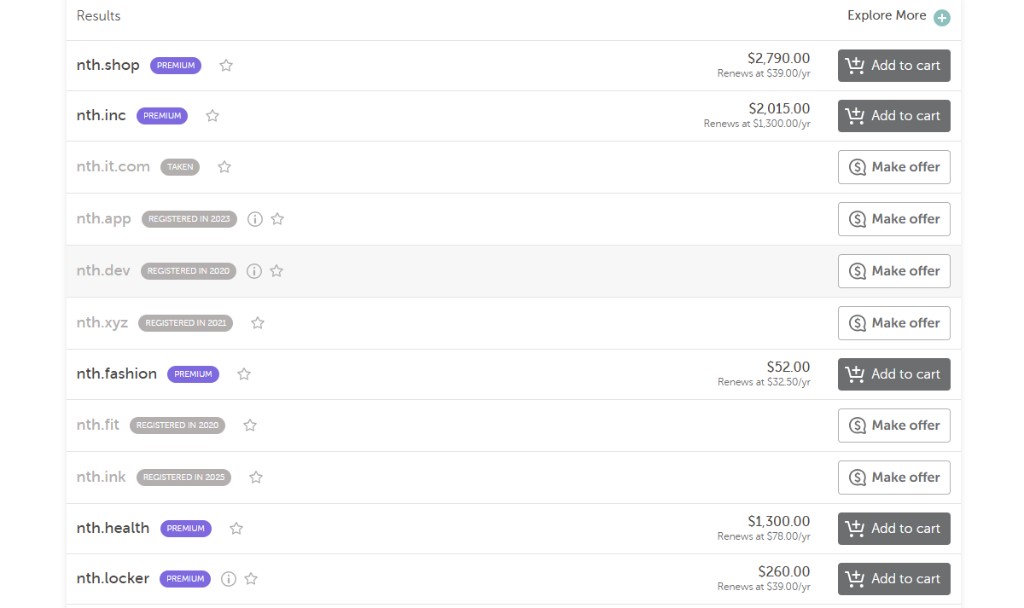
To keep things affordable, I’ll be posting to subdomains of my personal website instead going forward - like this little, loser flaskapp, and this very blog (which used to be at pennymark.ink; I only mention because I thought the name + extension had a poetic lilt to it).
This has given me a little bit of familiarity with Route 53, which I’m using to host the domain name and all the sub-domains, and Lambda (where the aforementioned Flask app is currently located, as it’s simple enough to not require a session). I’m currently also trying to think of a variety of apps - possibly a data-driven dashboard or something - that I can host across docker containers on EC2.
15 Jan 2026
This is a template blog post Claude whipped up for me.
14 Dec 2024
Nice!
This was pretty easy actually.
Instructions are clearly laid out in this article. The most important steps are:
- Set up a “property ID” (basically a unique idetifying key in a database that Google maintains)
- Place that property ID into some very simple code (see below), and add it to the files beneath your website
<script async src="https://www.googletagmanager.com/gtag/js?id=G-{ insert property id here }"></script>
<script>
  window.dataLayer = window.dataLayer || [];
  function gtag(){dataLayer.push(arguments);}
  gtag('js', new Date());

  gtag('config', 'G-{ insert property id here }');
</script>
If you’re interested to know why this works, I spent a little time trying to understand:
- Web browsers are an application that make a call to server when you enter a URL, a Uniform Resoure Locator
- They are returned sets of files that they render (they execute blocks of code, and visually represent that software syntax in a nice, graphical format)
- When your web browser receives my
html text files, it executes the above code, which:
- Instantiates a list
- Adds some data to that list
- Sends that data to Google’s servers
Remember, Google maintains a record of my property ID, which that data gets associated to. All of that information is then made available through the Google Analytics platform, and can be organized to look like the below:
Google Analytics Dashboard
For what it’s worth, you can specify other types of data (all related to the types of “cookies” stored in your web browser), but I haven’t got anything particularly interesting or different there, just the default stuff.
Complete aside: it looks like my website is getting hammered by Chinese servers. I’ve read this is because there are constantly an army of Chinese bots trawling American web sites for security openings. Stay safe out there! It’s the world wide web.
05 May 2024
What is Jekyll?
Jekyll is written in good ol’ Ruby. As is common in the world of software, Liquid is also in the mix, a templating language that is open-source and was created by Shopify in the early 2000’s. Jekyll templates are written in Liquid.
While that may sound complicated, at an implementation level, all that means is: you write templates, invoke those templates across your website, and inject specific content into those templates using {curly braces}.
To get started, simply download Ruby and add to path, then download Jekyll and Bundler (a dependency manager). And you should be good to go!
How does it work?
I think the most important thing to note here is really just how much Jekyll simplifies the process of standing up a website, if your focus is content. With the large volume of free templates already in circulation, all you have to do is find a format you like, host it on GitHub Pages, and write content in markdown.
When you push updates, the templates re-compile and automatically recreate a folder named _site, by standard convention. This _site folder contains all your static html files, which are returned to visitors upon HTTP request.
01 Apr 2024
Recently, I’ve been taking some baby steps to learn web architecture and development. A first step in this direction has been to explore Jekyll, which I learned about from a friend. Jekyll is a ruby app that can be used to quickly and cheaply spin up static web applications, with minimal software experience.
Jekyll has been a great place to start, because:
- It is a quick dev experience: there are many free templates out there that accommodate a wide range of use cases (just scroll through some of these examples to see)
- It is fast: no databases are involved
- It is also secure: no database means there’s nothing to hack
- It is cheap: again, no database means less operating costs, and in fact, you can host Jekyll blogs for free on GitHub, with two simple steps
- Point your domain name at GitHub’s servers
- Add your domain name to your GitHub repository
This blog will simply serve as my ongoing notes and takeaways on things I find interesting.
Thanks @mdo for Lanyon